Accessing Preferences
Access all program settings from the menu bar:
TimeNet Law → Preferences or use ⌘ + ,
The Preferences window has tabs for each major settings area:
- Firm ID - Your firm's identity and branding for invoices
- People & Fees - Timekeepers, billing rates, weekly goals, and positions
- Invoice Architect - Full control over invoice layout and design
- Billing - Currency, tax rules, automatic bookkeeper, late fees
- App Settings - Timer behavior, entry behavior, display options
- Shortcuts - Shortcut groups for rapid time entry
- QuickHelp - In-app help and guidance
The Control Center is a separate window (accessed via its own icon in the Preferences toolbar) for user permissions, auditing, lockout, and refresh.
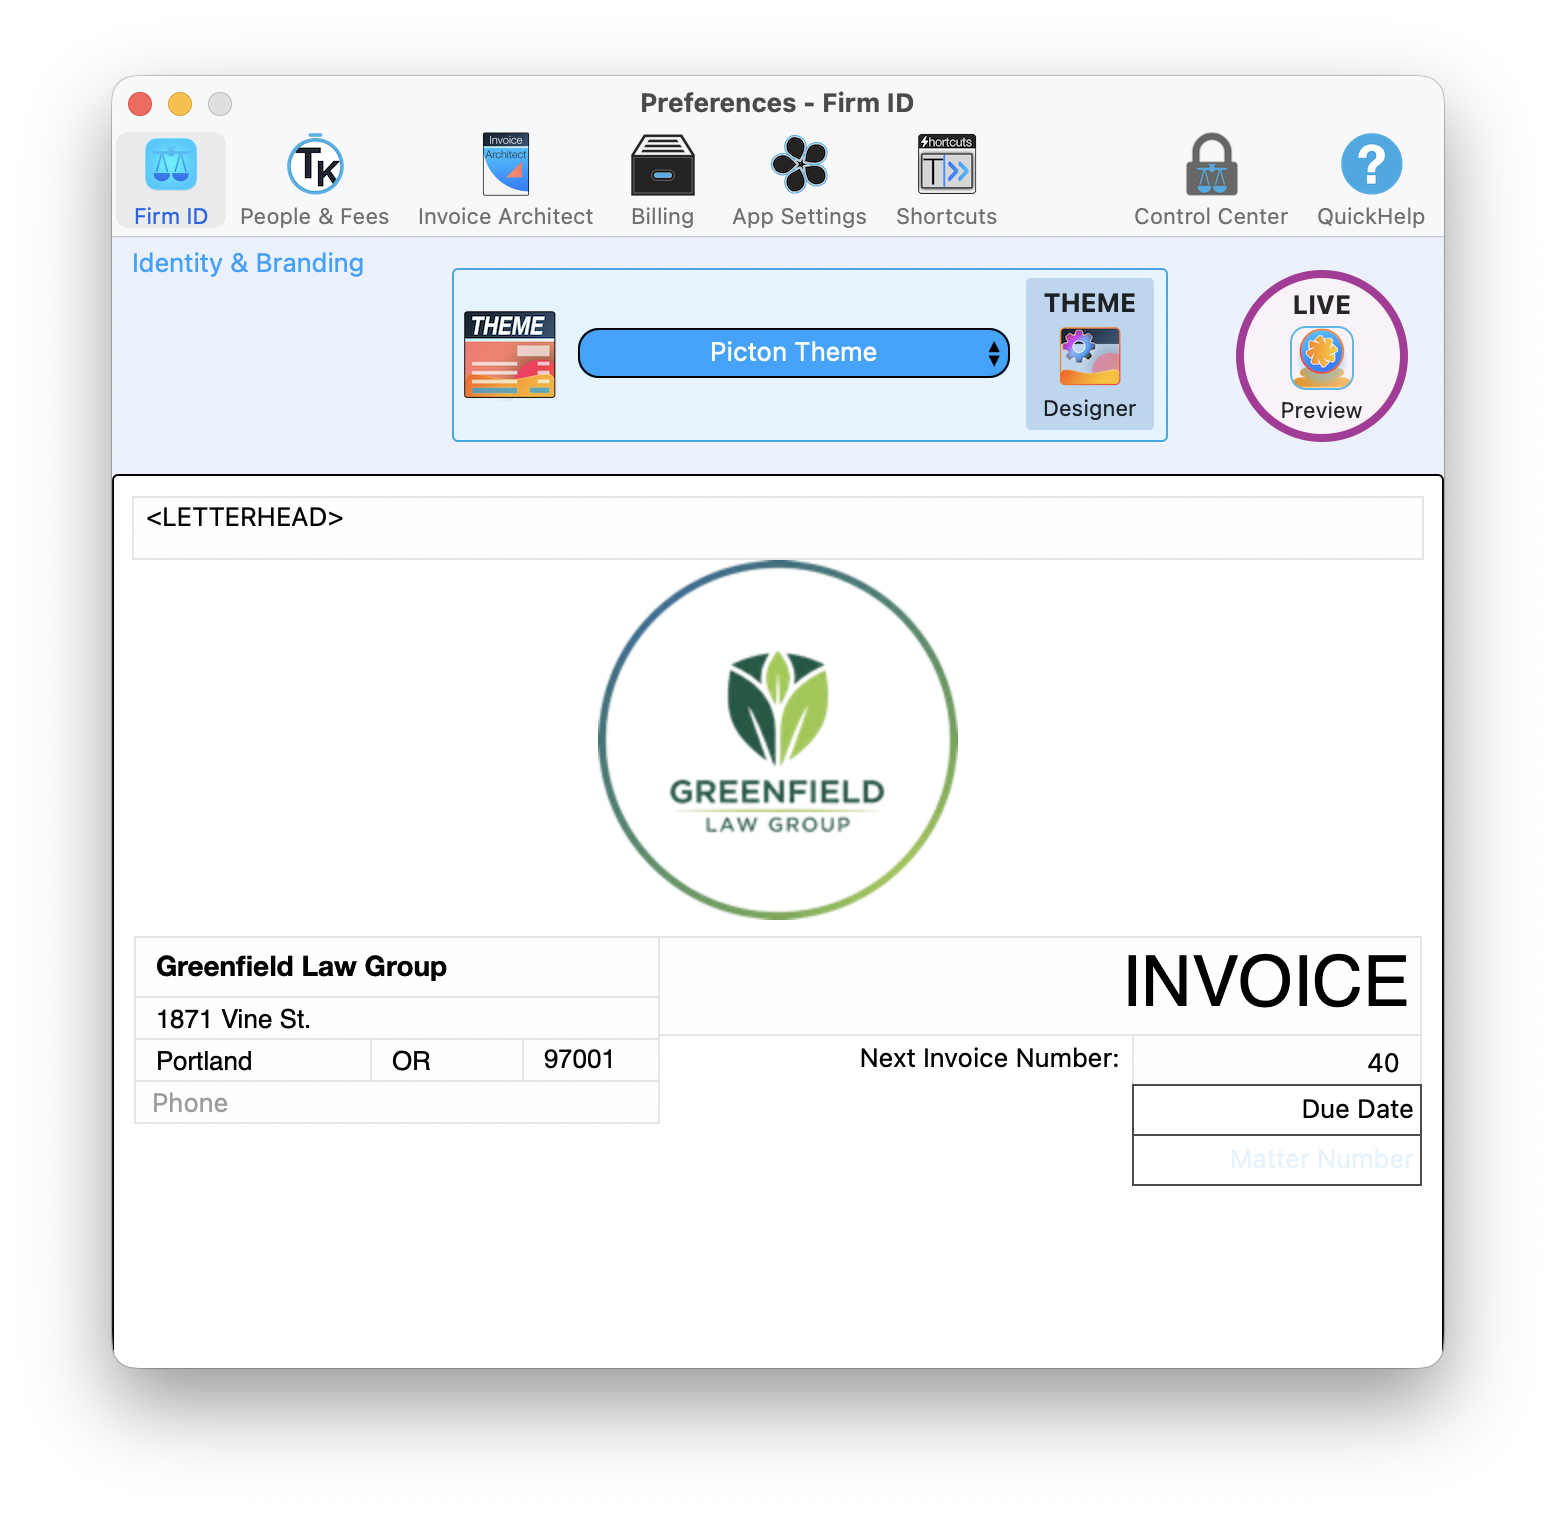
The Firm ID tab is where you set up your firm identity, choose a theme, and preview your invoice layout
Timekeeper Setup
Go to the People & Fees tab and click the + button to add a new timekeeper:
- Enter the timekeeper's Name
- Choose their Position from the dropdown
- Set their Status (Active or Inactive)
- Set an ID for quick identification
- Enter a Weekly Goal (billable hours target)
- Add one or more Billing Rates (for example, Standard $375/hr, Reduced $300/hr) and set one as the default
Use 2-3 letter initials that are unique. When entering time, you can type "JDS" instead of selecting "John D. Smith" from a dropdown.
Assigning positions helps with reporting and rate management:
| Position | Description |
|---|---|
| Partner | Highest rates, appears on partner reports |
| Associate | Attorney rates, tracks toward partnership metrics |
| Of Counsel | Special billing arrangements |
| Paralegal | Billable support staff |
| Legal Assistant | May or may not be billable |
| Admin | Non-billable time tracking only |
When rates change, TimeNet Law keeps history:
- Select a timekeeper and click the edit button to open their details
- Add or modify billing rates in the rate table (use +/- buttons)
- Click Set Selected Rate as Default to choose which rate applies by default
- Previous rates are preserved for historical time entries
Rate changes apply to new time entries only. Already-recorded time uses the rate from when it was entered. This is the correct behavior for accurate billing.
Flat Fee Templates
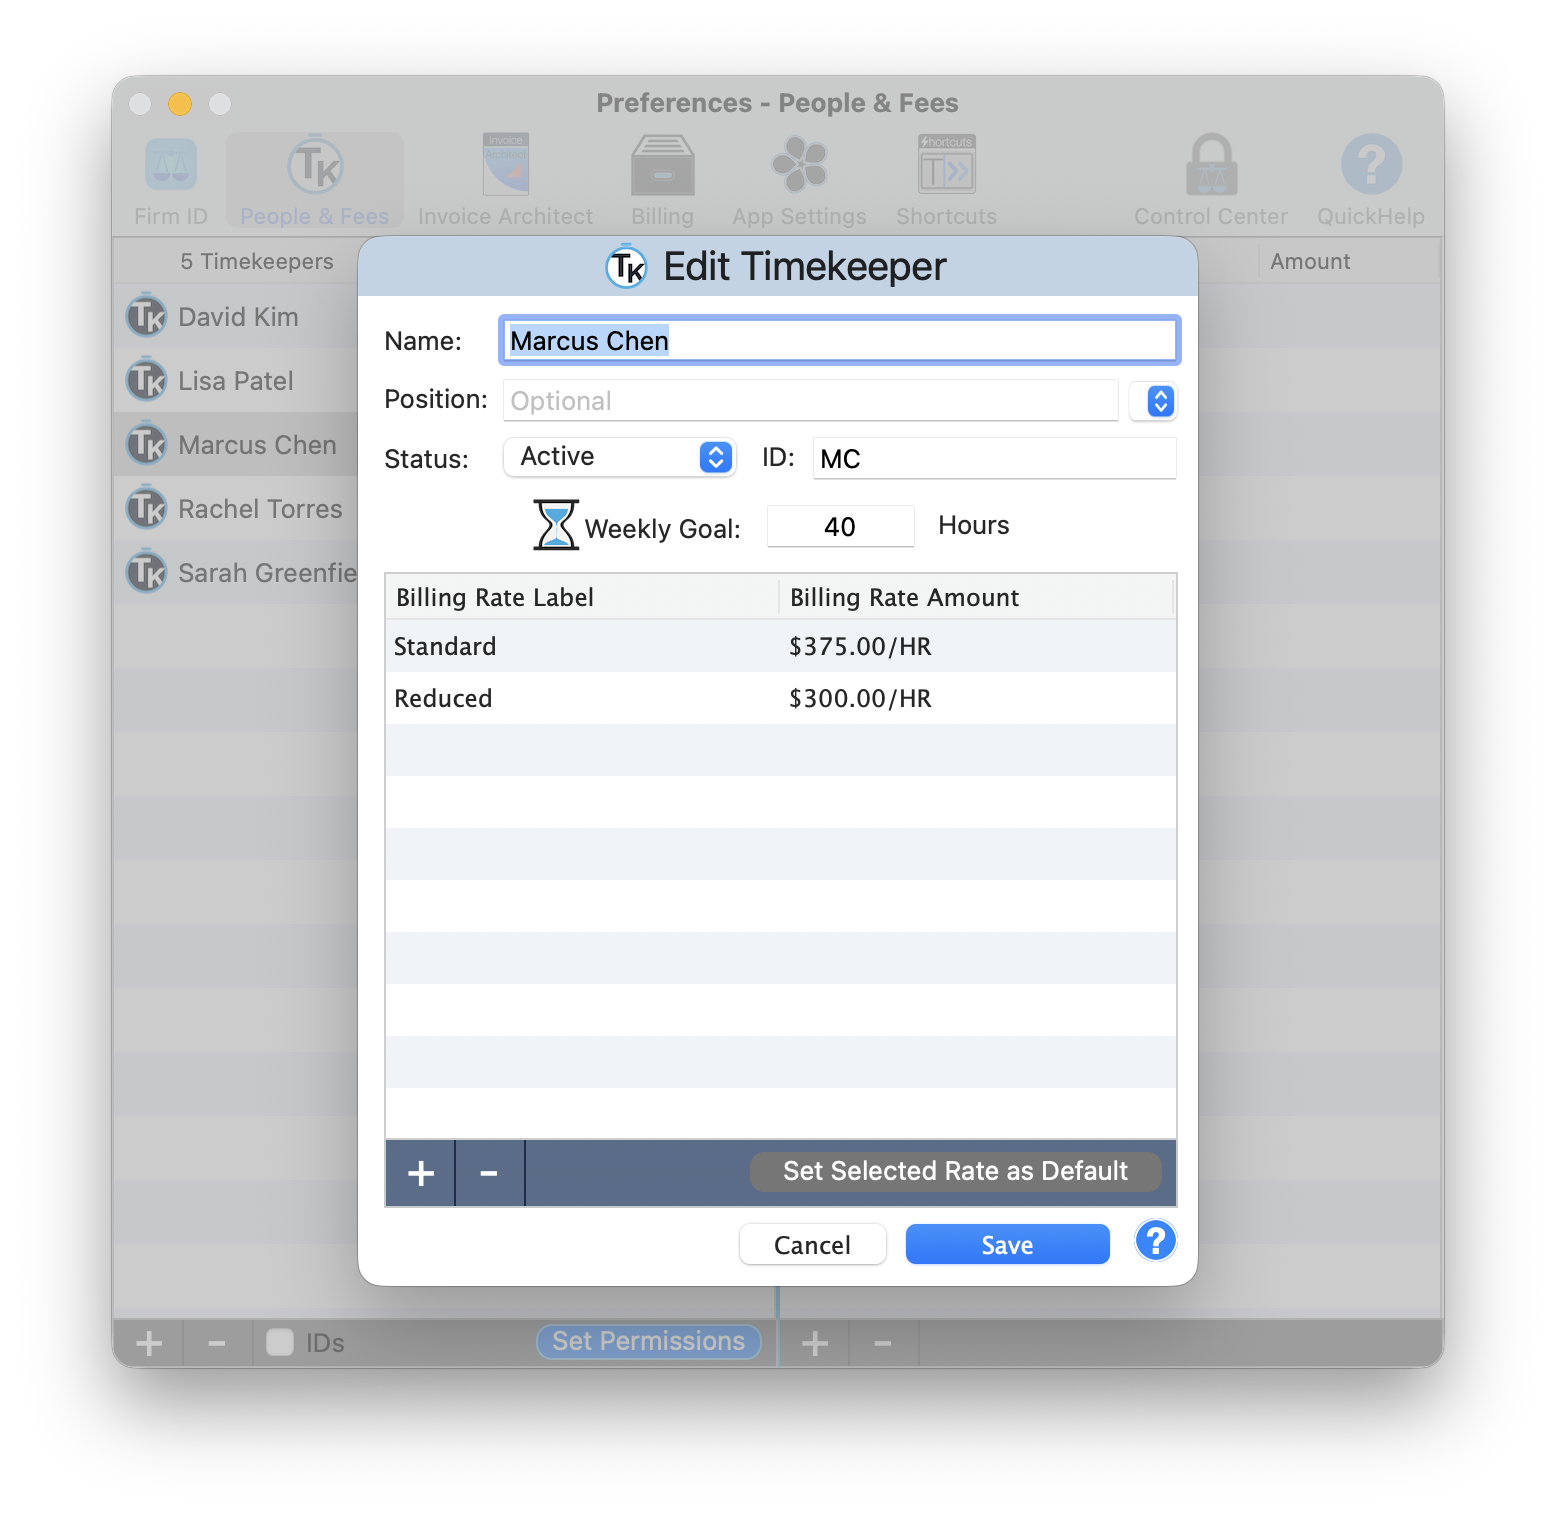
The People and Fees tab with timekeeper list and the edit dialog showing multiple billing rates, weekly goals, and a Set Permissions button
For services you offer at fixed prices, create templates:
- Go to Flat Fees tab
- Click Add Template
- Name the service (e.g., "Simple Will," "LLC Formation")
- Set the standard price
- Add a description (appears on invoices)
Create templates even if prices vary. When applying to a matter, you can override the amount. The template saves you from retyping descriptions.
Bundle related services into packages:
- Estate Planning Package - Will + POA + Healthcare Directive
- Business Startup Package - Formation + Operating Agreement + EIN
- Real Estate Closing - Title search + Closing + Recording
When you apply a package, all items appear as line items with a total.
Price packages slightly below the sum of individual services. Clients feel they're getting a deal, and you get the full engagement.
Appearance & Display
TimeNet Law automatically follows your macOS appearance setting. If you use Dark Mode on your Mac, TimeNet Law uses Dark Mode. No setting to configure, it just works. Every window, dialog, toolbar, and report respects your system preference.
Dark Mode works great for late-night billing sessions. Your eyes will thank you.
Invoice Preferences
TimeNet Law uses the Invoice Architect system for complete control over your invoice appearance. This goes far beyond basic settings. Logo placement, section ordering, column visibility, custom headers and footers, conditional formatting, and full template management.
See the dedicated Invoice Architect tutorial for the full walkthrough.
Control how time entries appear on invoices:
- Show Timekeeper - Display who did the work
- Show Date - Display when work was done
- Show Hours - Display time spent
- Show Rate - Display hourly rate
- Group by Timekeeper - Organize entries by person
- Group by Date - Chronological order
Most clients prefer seeing dates and descriptions. Showing rates can invite scrutiny. Test different layouts with a few clients.
Set up your invoice numbering scheme:
- Sequential - Simple incrementing (1001, 1002, 1003...)
- Year-Based - Includes year (2025-001, 2025-002...)
- Client-Based - Includes client code (ABC-001, ABC-002...)
Set your starting number to continue from your previous system.
Never reuse invoice numbers. If you need to void an invoice, mark it void rather than deleting. Your accountant will thank you.
Trust Account Settings
In the Trust Accounts tab:
- Click Add Trust Account
- Enter the bank name and account number (last 4 digits)
- Set the account nickname (e.g., "Main IOLTA")
- Enter your state bar's IOLTA requirements
Trust accounting mistakes can end your career. Take time to set this up correctly. When in doubt, contact Perry for a walkthrough.
TimeNet Law includes safeguards you can enable:
- Prevent Negative Balances - Block disbursements exceeding client funds
- Require Approval - Two-step disbursement process
- Balance Alerts - Warning when balance drops below threshold
- Monthly Reconciliation Reminder - Prompts to reconcile
Enable "Prevent Negative Balances" immediately. This one setting has saved countless attorneys from accidental commingling.
General Program Settings
In the Firm ID tab, set up your firm basics:
- Firm Name - As it appears on invoices and correspondence
- Address - Billing address
- Phone/Email - Contact information
- Tax ID - For payment reporting (optional)
- State Bar - Your jurisdiction
- Data History Cutoff - Control how far back TimeNet Law loads data. Blank loads everything. Set a number of years to speed up launch for firms with decades of history.
Set defaults that apply to new records:
- Default Timekeeper - Pre-selected when entering time
- Default Billing Increment - 6-minute (0.1) is standard
- Default Payment Terms - Applied to new clients
- Default Matter Status - Usually "Active"
If you're a solo, set yourself as the default timekeeper. Saves a click on every single time entry.
Choose how time is rounded:
| Increment | Minutes | Best For |
|---|---|---|
| 0.1 hour | 6 min | Standard legal billing (most common) |
| 0.25 hour | 15 min | Higher minimum per task |
| 0.05 hour | 3 min | Very precise tracking |
| Actual | 1 min | No rounding at all |
Some clients contractually require specific increments. Check your engagement letters before changing this setting.
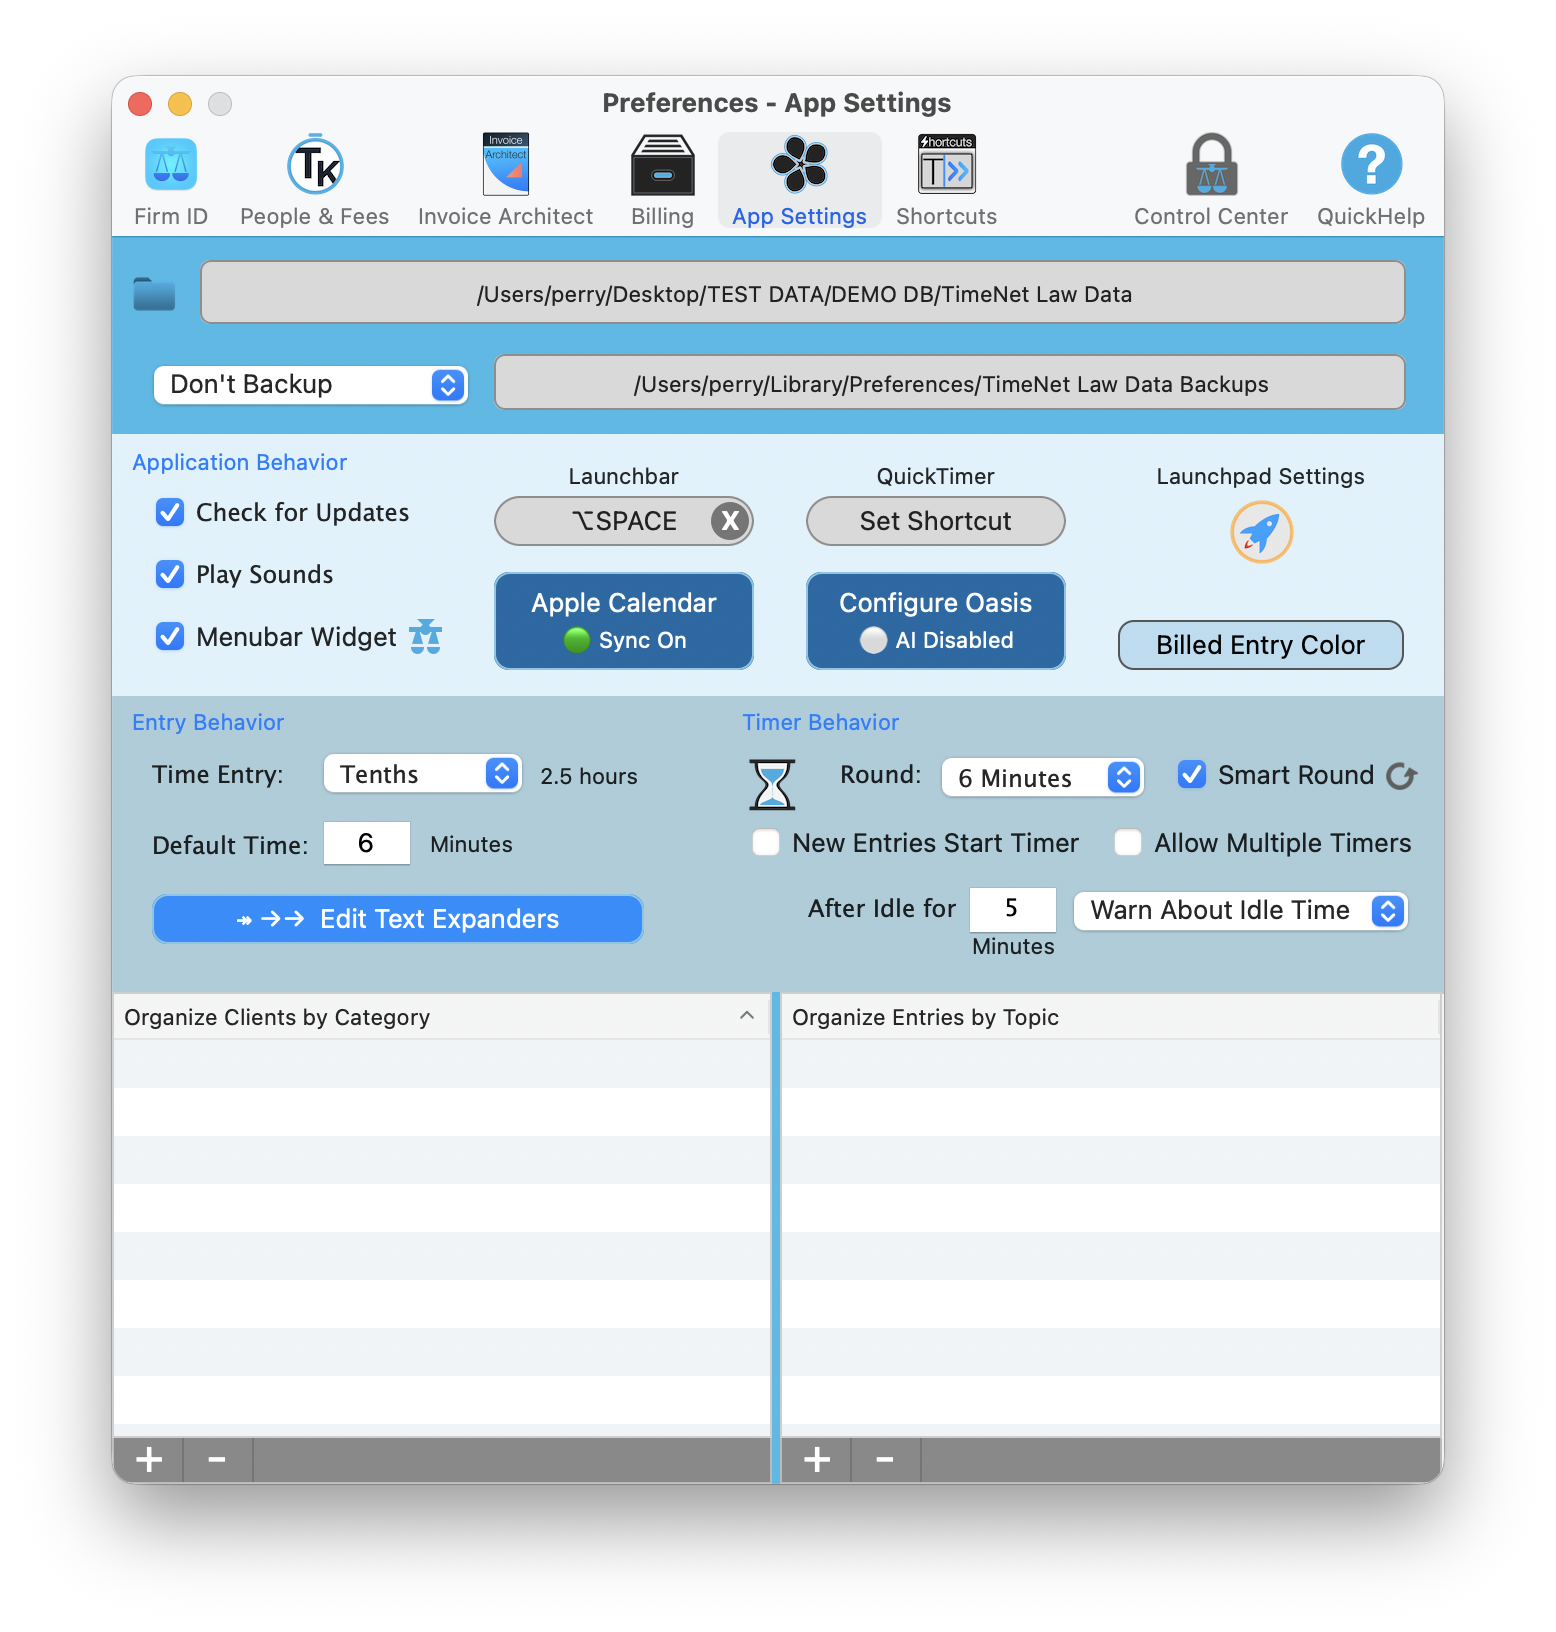
The App Settings tab controls timer behavior (rounding, idle detection), entry behavior (text expanders), and display options
Backup & Security
In the Advanced tab, configure backups:
- Backup Frequency - Daily recommended
- Backup Location - Choose a folder (preferably cloud-synced)
- Retention - How many backups to keep
- Backup on Quit - Creates backup when closing app
Point your backup folder to iCloud Drive, Dropbox, or Google Drive. Your backups are automatically off-site without extra steps.
Your TimeNet Law database can be stored:
- Local - On your Mac (fastest, single-user)
- Network - Shared drive (multi-user access)
- Cloud - iCloud/Dropbox folder (access from multiple Macs)
If using cloud storage, only open the database from one computer at a time. Simultaneous access can corrupt the file.
Need Help With Setup?
Perry offers free setup calls for new users. Screen share, walk through your workflow, get everything configured right the first time.
Schedule a Setup Call - Usually same day